Lapbooks: The Ultimate Guide
Here at Homeschool Share, we’ve been asked quite a few lapbook questions over the past fifteen years: What is a lapbook? Why should my students make them? What supplies do I need for lapbooking? Where can I find pre-made lapbooks? Can I make my own lapbooks? How should I store them?
This giant How to Lapbook Guide will help you navigate your way through several questions about lapbooking. As you read, remember, there isn’t a right or wrong way to lapbook. Do what works best for you and your students.

What Is a Lapbook?
Lapbook? Wait. What? What is the meaning of the word lapbook?
A lapbook is a versatile educational tool used to compliment a study of any topic or subject for any age.
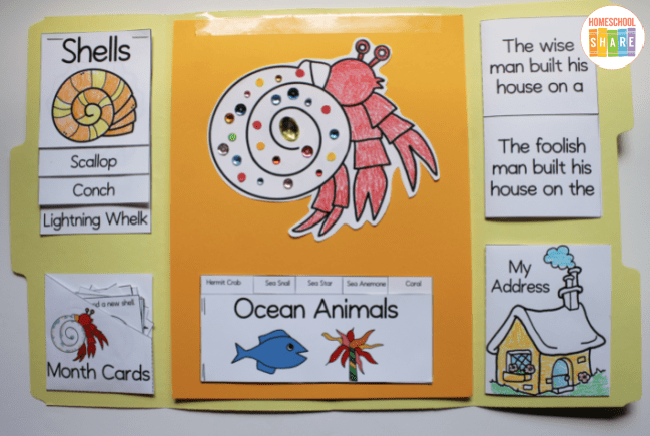
The inside of the file folder is filled with miniature books (mini-books) and other components that are a collection of what the student has learned about a certain topic.
How Do I Make a Simple Lapbook?
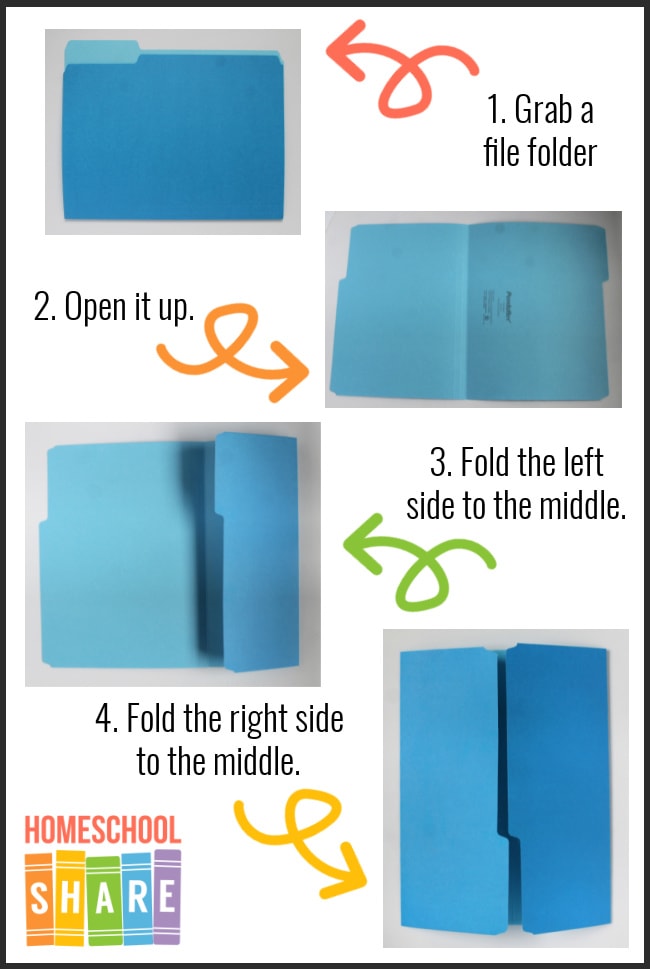
The base of a lapbook is a file folder refolded to open like window shutters. It’s refolded in order to fit on a student’s lap so he can easily hold and manipulate it.
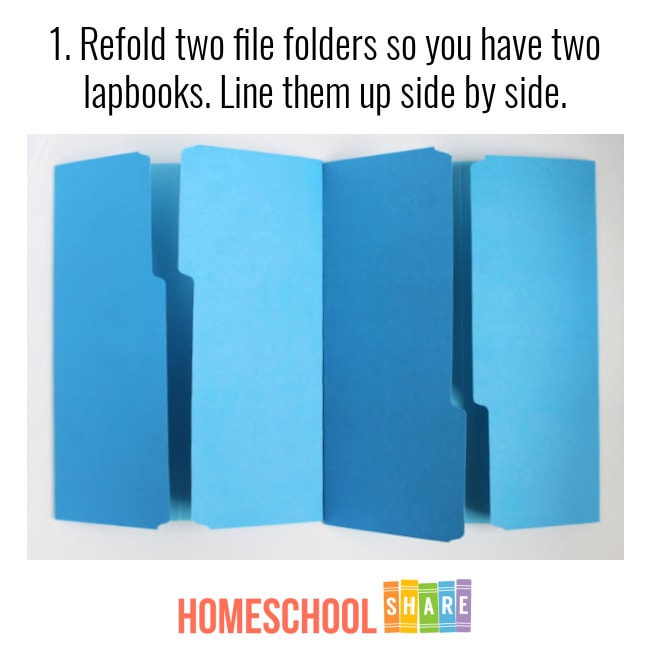
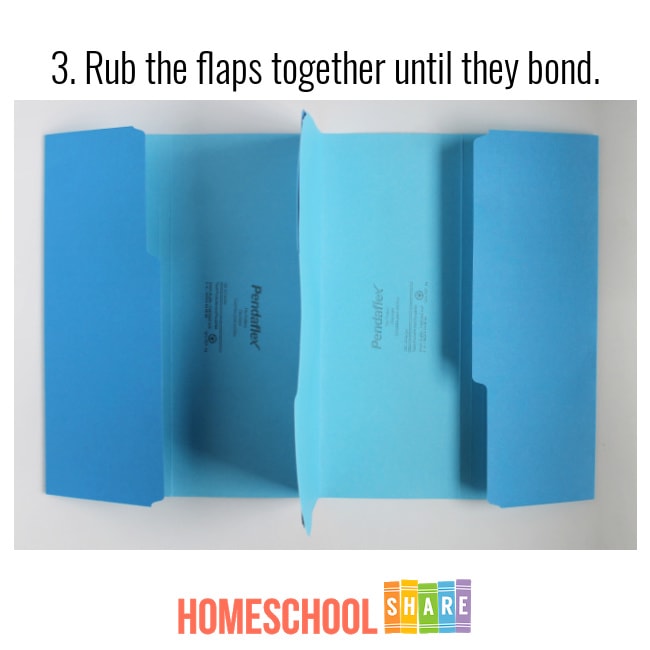
How Do I Create a Lapbook with Two Folders?
If you ever need to make a double lapbook with two file folders, here is a quick tutorial.
First, refold two file folders so you have two lapbooks. Line them up side by side.
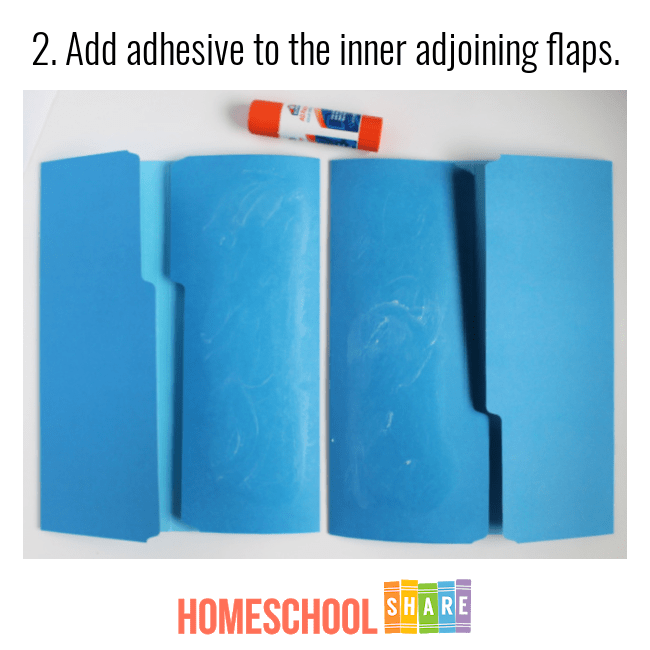
Second, add glue to the inner adjoining flaps.
Pro-tip: My favorite adhesive is rubber cement. I add it to both sides, let it dry, and then it creates a super sealed bond between the two folders.
Finally, rub the flaps together until they bond.
Sometimes you don’t need TWO file folders. Alternatively, you can add an extension to the center of your lapbook. I use packing tape and tape a piece of cardstock to the top center of the lapbook. I use the tape on both sides to secure the extension.
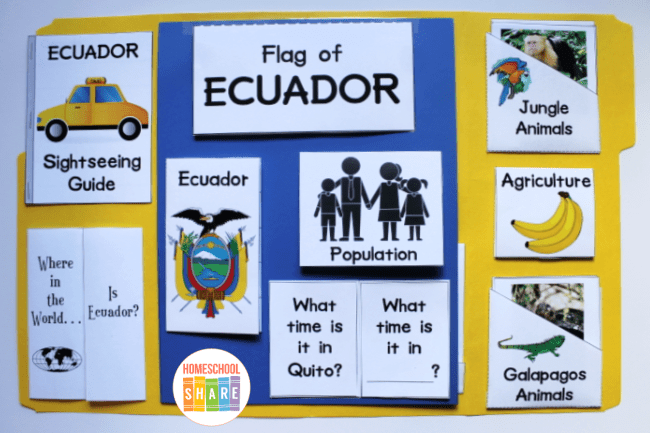
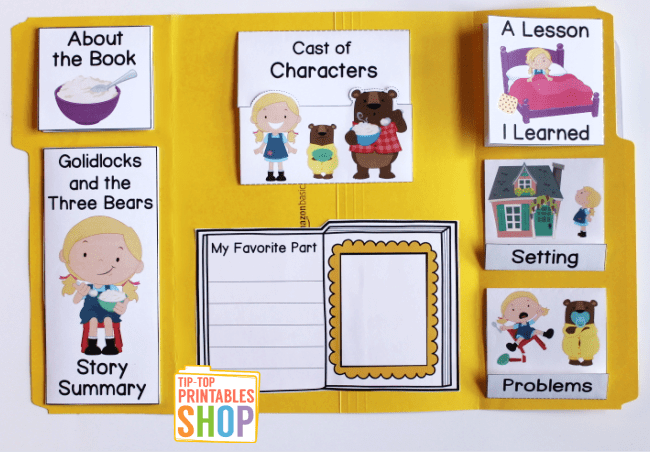
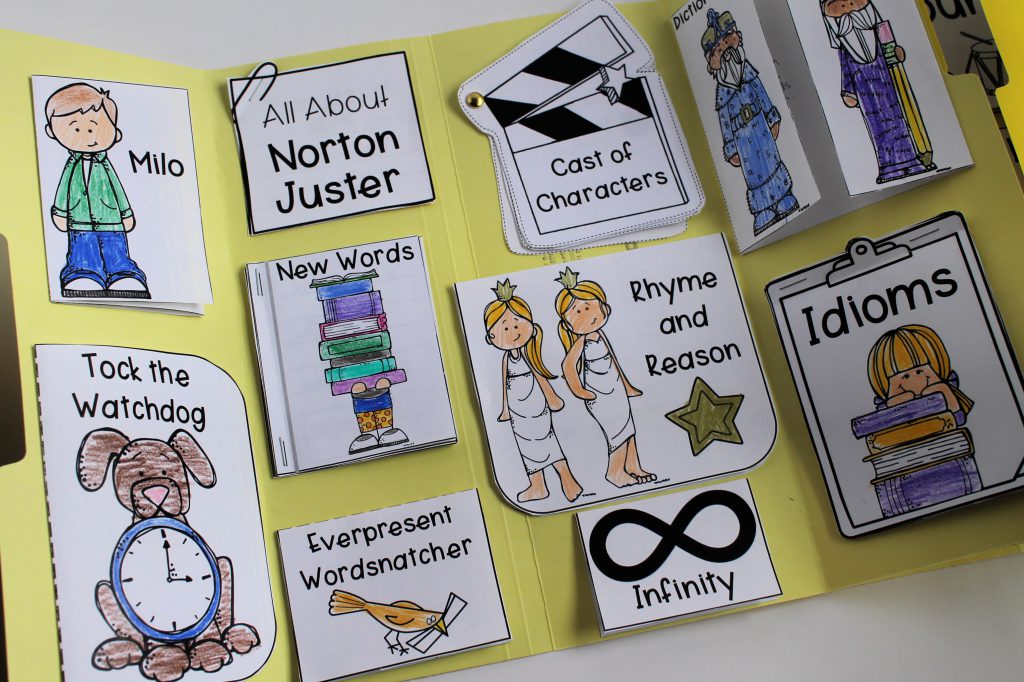
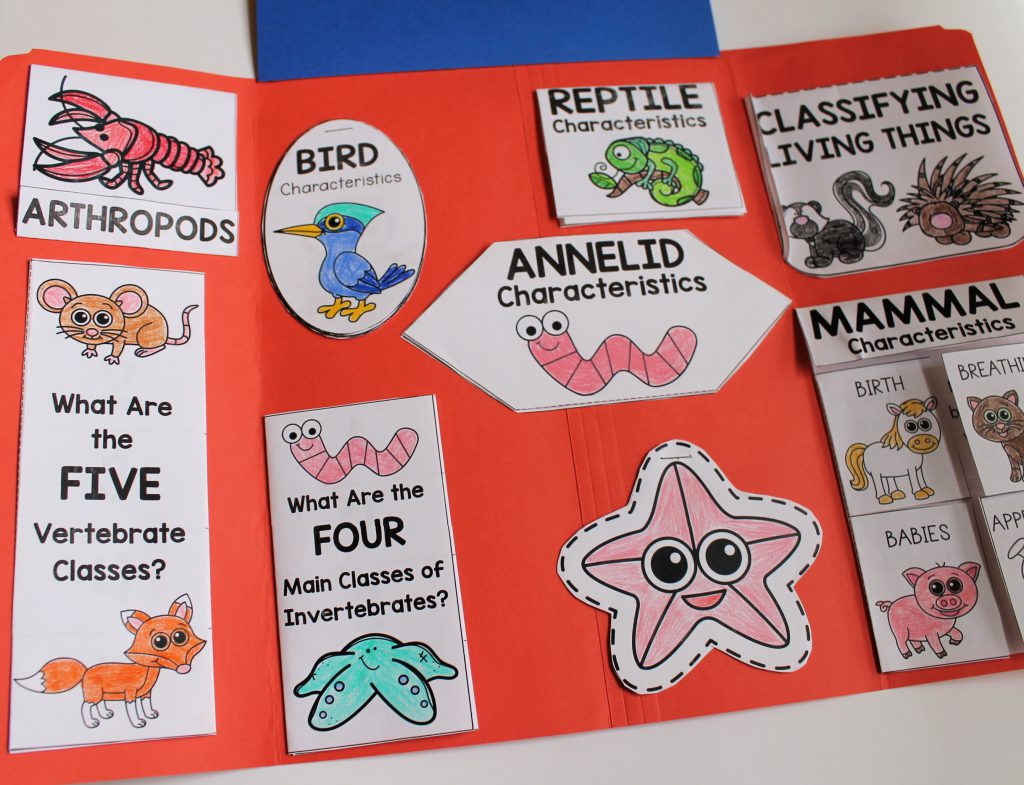
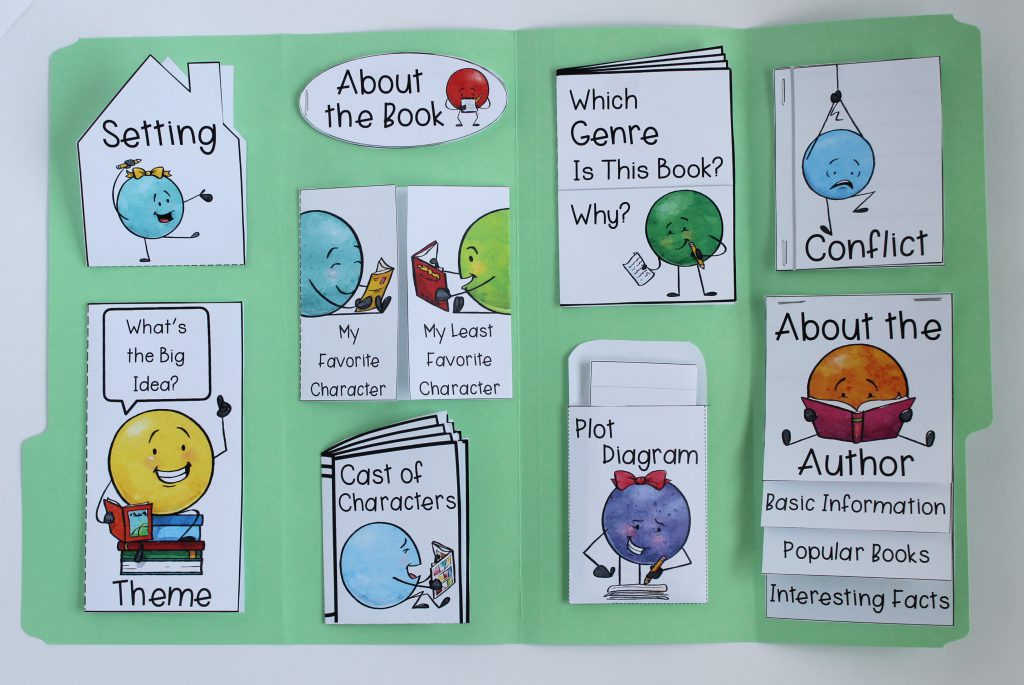
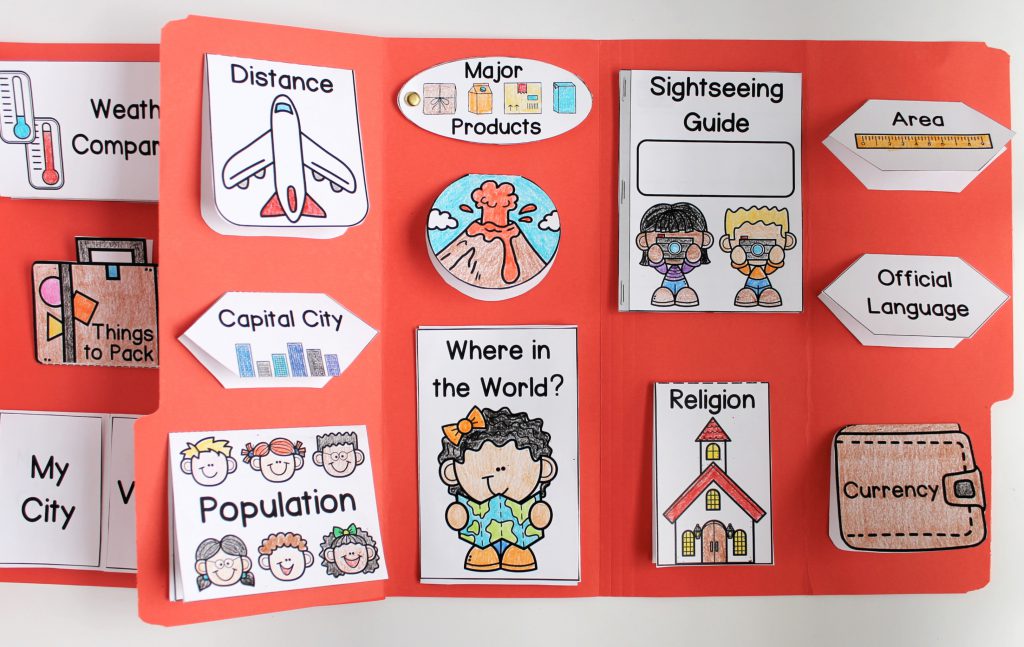
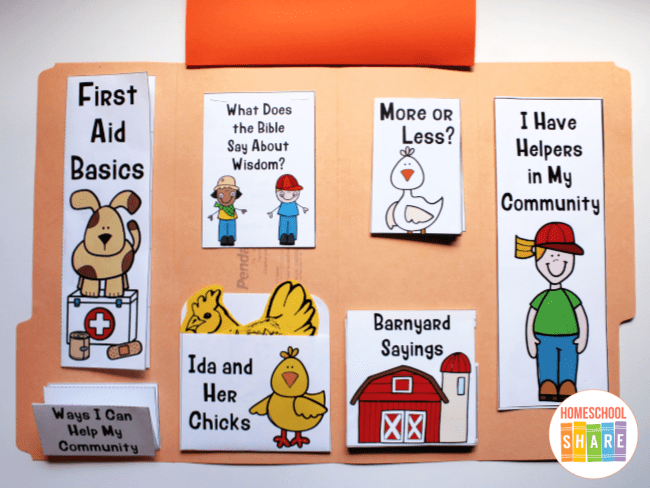
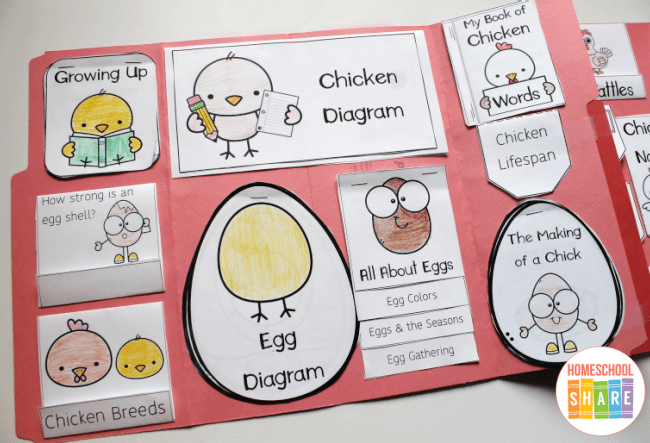
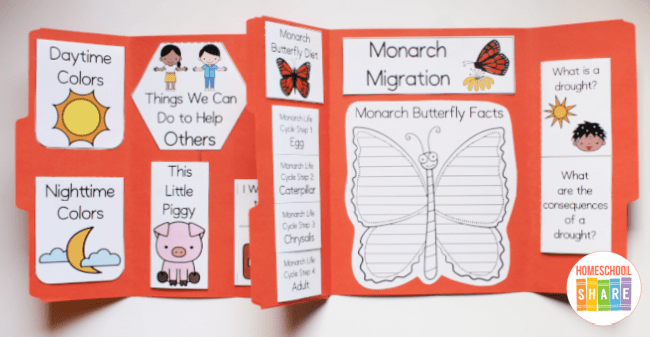
Lapbook Examples
Some people (like me!) need to see things in order to visualize them. Here are a few examples of the free lapbooks you’ll find offered here at Homeschool Share.
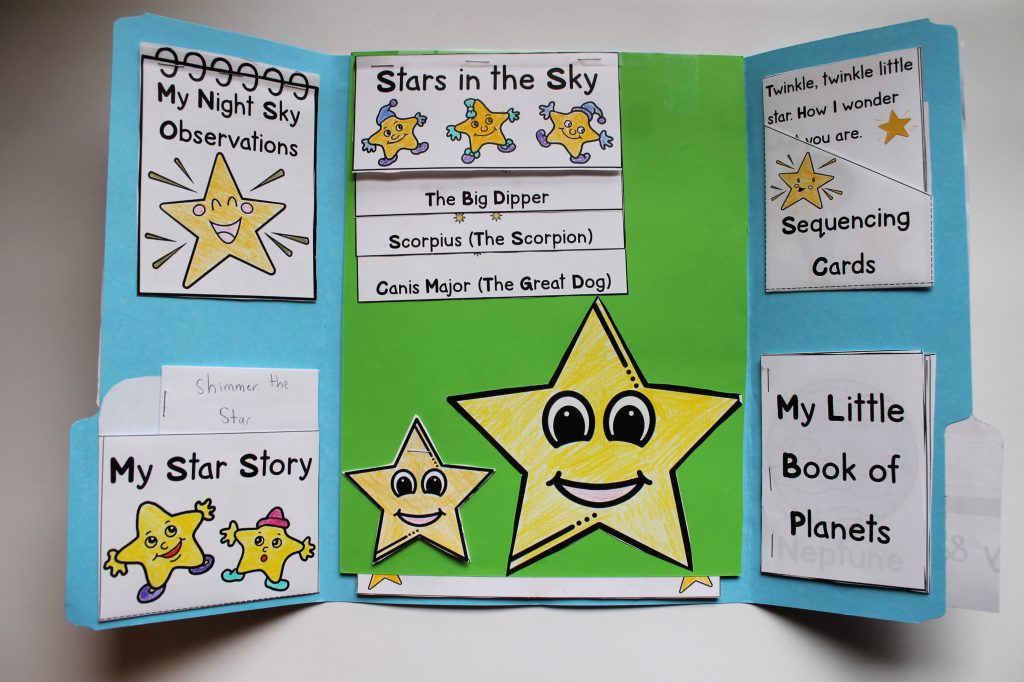
We also have a few lapbooks available for purchase at the Tip-Top Printable Shop.
Benefits of Lapbooks in Your Homeschool
What is a lapbook used for? What is the purpose? Is it just busy work? No! Lapbooks are great for a variety of reasons.
- Review and Reflection
Lapbooks are an amazing tool for review. The lifting, flipping, and flapping of the mini-books provides a fantastic tactile experience for your student. Reading and reviewing the lapbook will help to cement the concepts your student has learned. - Organizing Schoolwork and Organizing Information
Sometimes completed worksheets and activities end up scattered here, there, and everywhere. A lapbook gives a student a place to organize their learning on one topic. Everything goes in (and stays in) the lapbook. This cuts the clutter in your classroom. This also teaches your student how to begin to organize information. - Ownership
Students can individualize their lapbooks with colors, stickers, additional mini-books, photographs, drawings, etc. My son always had input as to how he wanted arrange the mini-books to create his final lapbook layout. He also had ideas for mini-books that he wanted included—things he had learned that were important to him. Completing a lapbook gives the student a sense of ownership and pride. - Presentation Skills
As your student shows off her lapbook to friends and family, she will not only be revisiting the information she’s learned, she will also be developing speaking skills. Some families even create videos of their students presenting their lapbooks.
Lapbook Supplies
The first step in lapbooking is gathering all your supplies. It is helpful to have all your supplies in one place, so lapbooking doesn’t become a chore, having to search everything out each and every time you lapbook. Several homeschool moms who use Homeschool Share have offered up these suggestions of what they would include in a perfect lapbooking kit:
Storing Lapbook Supplies
Some teachers like to use a tote bag with lots of pockets, like those designed for scrapbooking, and others use a bin or drawer.
For ease, you can store everything in a caddy. This helps cut down on the crazy and the mess while your student works through his lapbook.
Paper for Lapbooks
You’ll want to have a good assortment of paper to print your components on.
Astrobrights are preferred for their thickness and colors. You can also get 800 sheets of 24lb white paper at Costco.
A selection of cardstock is good to have on hand. My oldest student likes to glue her mini-books to cardstock and store her pages in a binder, so we actually go through more card stock than file folders.
Cardstock also works better than standard weight paper for some components, such as fan books. It’s good to have a selection of white cardstock and various colors.
Some lapbookers keep all of their paper organized in a hanging file.
File Folders
Most lapbookers glue their components into file folders. Depending on the lapbook you are completing, sometimes two or three file folders are attached together to form one lapbook.
Although colored folders cost a bit more than standard manila folders, children love having colorful folders to choose from. Buy what you can afford, stock up when there are sales, and eventually you’ll have a good selection.
Notebooks or Binders
Some students don’t glue their components into file folders or onto cardstock. They prefer pre-made notebooks, especially those at Bare Books. They are spiral bound, hold up well, and are perfect for those larger lapbooking projects.
Adhesives for Lapbooks
Adhesives will be needed to glue some components together, and to attach components into lapbooks. Some of our favorite adhesives are:
- Double Sided Tape
- Rubber Cement (perfect if you don’t want lumps or bumps)
- Elmer’s Glue Sticks (Hint: stock up during back to school sales; we use a couple dozen a year!)
- Elmer’s Glue Pen – SUPER sticky and great for attaching small adornments to lapbooks.
Brads
Brass paper fasteners come in handy for wheels and fan books. Scrapbooking brads are smaller and MUCH easier to use. However, you can cut the ends off of the big fat brads, if you need to.
You can get the itty bitty brads at Hobby Lobby for 40-50% off when they have their Spare Parts on sale. Be on the look-out for theme- related brads, too. We’ve purchased fish and flower shaped brads at Big Lots for $1.
Velcro
Sometimes you may want components that can be removed from your lapbook, and Velcro works great for this, especially for matching games.
While you can purchase Velcro dots, it is much cheaper to buy a roll and just cut it as needed.
Drawing and Coloring Tools
Crayola crayons work fabulously for younger students. Older students agree that Prisma Color Colored Pencils are the first choice for coloring in components.
You may also want some fine tip markers, and pencils. Things like glitter pens and puffy paint pens are also enjoyable to use to decorate lapbooks.
Other Lapbook Tools
Other assorted items high on the list of should-haves include:
- Scissors (straight edge is a must, but fancy cut are fun too!)
- Stapler (a swivel one is nice, but you’ll definitely want one at least 4” deep)
- Single Hole Punch (some prefer a 1/8″ hole punch so the punch isn’t too large for the brass fasteners)
- Three Hole Punch (if you think your student would like to make notebooks)
- Paper Cutter (makes life so much easier!)
- Laminator (one Homeschool Share mom says, “I LOVE IT! I couldn’t go without!”)
Lapbook Supply Kits are fun to assemble and don’t need to be expensive. As it is said, “necessity is the mother of invention” and some of the most creative ideas need little or no money. Look around your house and in your craft stash. What can be recycled, reused, or repurposed? I’ve heard of people using brown paper bags (great for an old timey feel), pizza boxes (for lapbooks about Italy or pizza), flattened cereal boxes (for lapbooks about grains or nutrition) and other creative materials.
Keep your eyes open at thrift stores and yard sales, you just never know what you’ll find to add to your lapbook supplies.
Where to Find Lapbooks
You can find a variety of lapbooks for free and for sale all over the web. One thing I love about lapbooks is that no matter what your students are interested in, you can turn that interest into a lapbook study.
Free Lapbooks
You can start at Homeschool Share. We have hundreds of lapbooks!
Some other places to look for free lapbooks:
Lapbooks to Purchase
You can also find lapbooks for purchase.
- The Tip-Top Printable Shop at Homeschool Share
- Amanda Bennett Unit Studies (many of these unit studies include lapbooks)
- Homeschool in the Woods (lots of history based lapbooks)
Lapbook Ideas
If you are looking for lapbook ideas, we have gobs and gobs! Try our Lapbook Ideas post to spark your imagination. This post includes base ideas, cover ideas, seasonal ideas, and a giant list of things you can include in your lapbook projects.
How to Make a Lapbook
There is not one correct way to complete a lapbook. The purpose of lapbooks is for students to be able to record and preserve the lessons they’ve learned in a fun and creative way.
Note: It is best for your students to take ownership of this project, with minimal parental input. However, your child (especially your young child), may need some help with cutting. You can help without taking over the project.
That being said, the best way to get started is simply to start!
Lapbook Preparation
Print the lessons. Look through and decide which ones are relevant for your student. Remember, there is no need to complete every lesson within a study. Tailor the study for your student.
Some of the lapbooks at Homeschool Share include a ginormous amount of mini-books. This is not to exhaust the topic (or your student). This is to allow you to choose lessons and mini-books based on your student’s interest and ability.
Print the mini-books that correspond with the lessons you’ve chosen. Be careful to note if anything should be printed on cardstock.
Decide how long you will spend on the study.
Organizing Your Lapbook Study
After you’ve worked through the prep, organize the lessons and mini-books.
You can write Day 1, Day 2, Day 3, etc. on the pages of the mini-books, according to your plan. Beginners may want to start slowly—with just one mini-book per day.
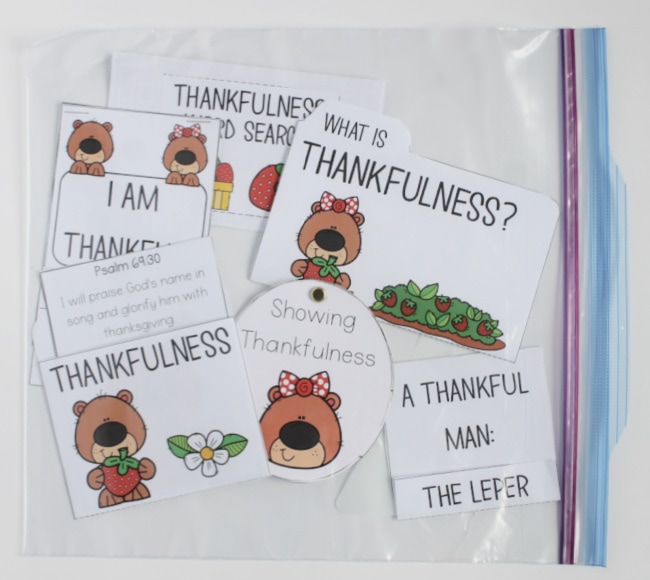
As you work through the mini-books, put the completed books in a gallon size Ziploc bag. This will help them to stay clean and wrinkle-free.
Lapbook Completion
At the end of your study, get all of the mini-books out of the bag. Marvel at the amount of work your student has accomplished!
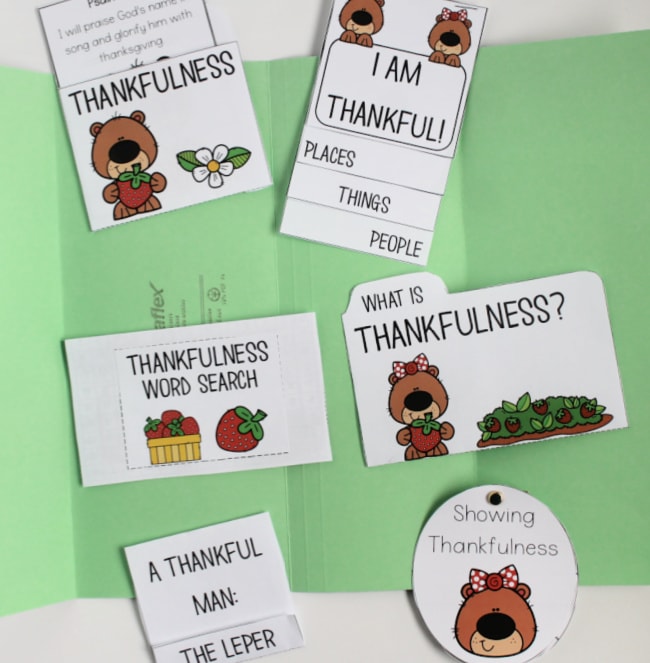
Spread them out on a surface. This will help your student visualize how much space will be needed for the mini-books. The number and size of lapbook components will determine the number of file folders or extensions you will need for the project.
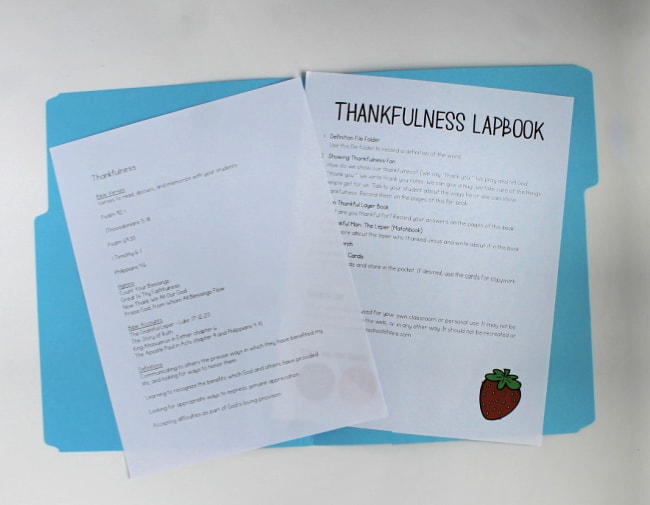
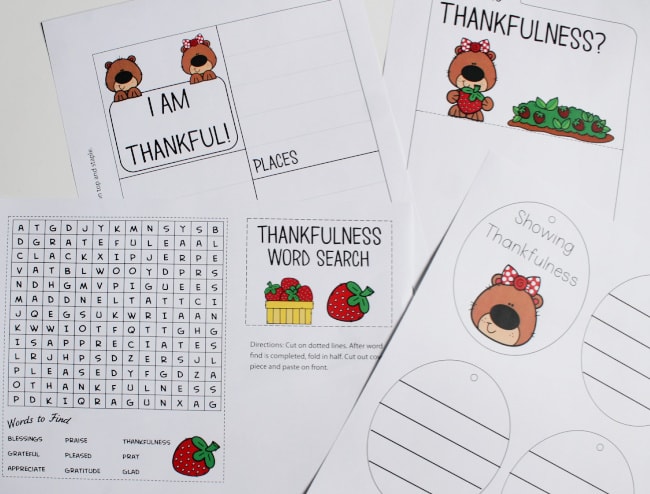
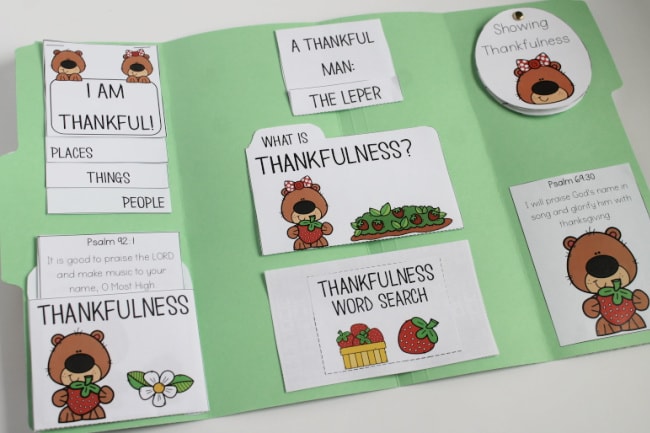
This Thankfulness Lapbook sample is a small lapbook and only requires one file folder. After your student determines a lay-out, glue everything to the lapbook base.
How to Design Your Own Lapbook
Yes, you can make your own lapbooks.
I have found that the easiest way to structure a DIY lapbook is to find a well-rounded, informative, and fun book for a spine. You can use a fiction book or a nonfiction book.
The first thing I do is read through the book and make notes about topics I would like to include in the lapbook. I look for topics across the curriculum, my goal being to have 8-10 lapbook components.
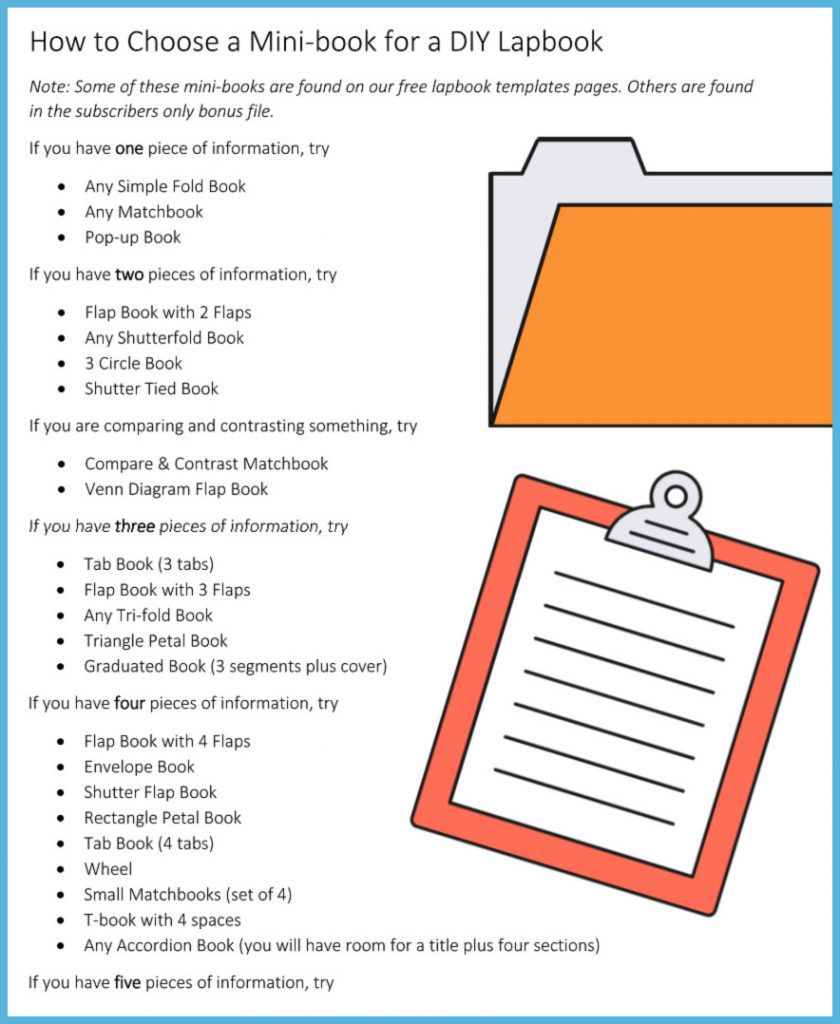
As I look at my notes, I determine what topics I want to reinforce with a lapbook mini-book. Then I determine which mini-book component will be best suited for each topic. How many pieces of information will be included? How much writing space will be needed?
Here is a basic reference guide to help you determine which mini-books might be best suited for the information your student is learning. Just click the image to grab a copy of it.
Here at Homeschool Share, we offer gobs of free lapbook templates to print. Your students will need to add text and draw images. Familiarizing yourself with the templates will help you as your design your own lapbooks.
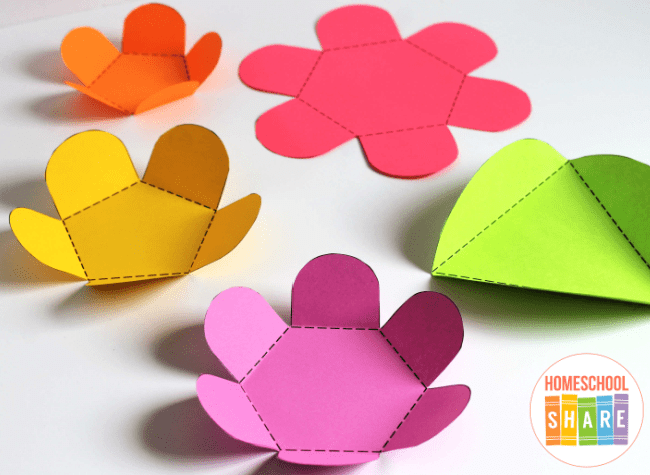
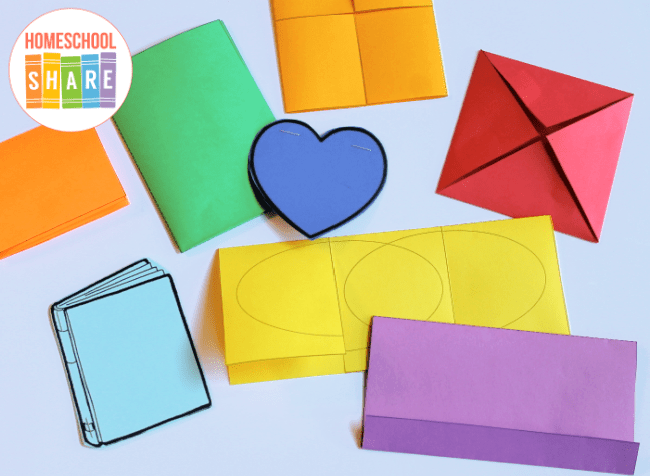
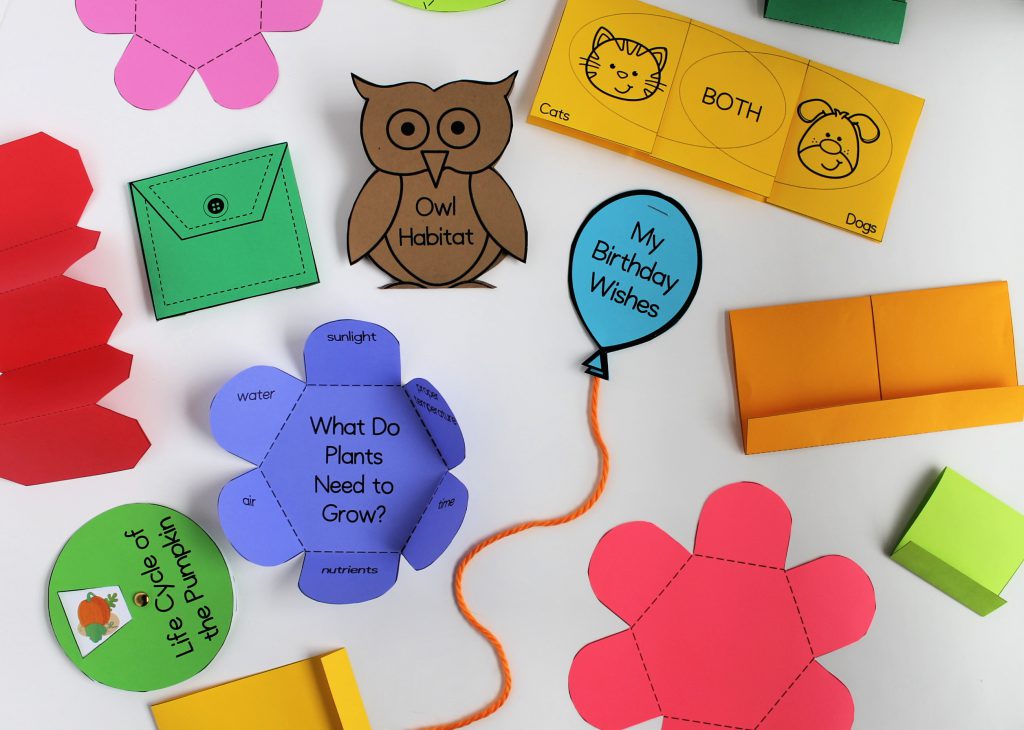
These are some of the easiest mini-books to start with:
As you grow in your confidence try some of these mini-book templates:
- Tab Books
- Accordion Books
- Flap Books
- Pockets (you can store all kinds of things in pockets)
- Petal Books
If you’d prefer, you can snag the entire bundle of basic lapbook templates here.
If you would like a bigger variety of free lapbook templates, you can grab our subscriber only BONUS lapbook templates.
Additionally, here are a few lapbook ideas for advanced lapbookers:
Editable Lapbook Templates
If you have PowerPoint and would like to type with your own fonts and add your own clip-art, buy this editable lapbook template set from the shop.
You can make a lapbook for any subject with these editable lapbook templates.
How to Store Your Homeschool Lapbooks
So much time is invested in the making of lapbooks that it would be shameful to just haphazardly pack them away, never to be seen again. Here are some tried and true ideas of how to use and store completed lapbooks.
Use Lapbooks for Reference, Review, and Reminiscence
Lapbooks are such wonderful reference and review tools, but not if they are packed away and inaccessible to the children. As we cycle through our chronological history units, before starting a new rotation, we will often pull out our lapbooks to do a quick review of what was learned previously. It is great fun to reminisce about the projects we completed and memories we made.
Use Lapbooks for Evaluation
If your homeschool is required to produce proof of academic achievements, many an evaluator has been impressed with learning through lapbooks. Completed lapbooks, or photos of lapbooks, can be included in your children’s portfolios.
Use Lapbooks to Show Off!
Lapbooks are a great way to show off to grandparents or homeschool naysayers. My students have shown their lapbook creations to public schooled friends, leaving them with a sense of envy at what they are missing out on! Homeschoolers have also been successful at showing off their lapbook creations at science or geography fairs, setting them up on easels. A lot of work went into their making, so show off those lapbooks!
Lapbook Storage Ideas
- Binders
One of my students attaches the mini-book components to cardstock which is hole punched and inserted into three ring binders. This is nice and tidy and allows her to explore a topic to its fullest because many additional pages can be added. She can also easily add notebooking pages. This is a great method for older kids, and the binders are easy to store on a shelf. - Nadene at Practical Pages uses the duct tape hinges, and then stores her lapbooks in nifty spiral bound notebooks.
- Cereal Boxes
If you want to save money, make snazzy lapbook storage units out of cereal boxes. - Magazine Holders
If you don’t have the time or desire to make your own lapbook storage units, magazine holders work wonderfully. - Hanging File Folders
My friend Ginger uses hanging file folders to store her students’ completed lapbooks.
If you have any questions about lapbooks or how to make a lapbook, please contact us. We’ll be happy to help!
Happy Lapbooking!